When I dare admit my love of “5 minute breads” to true breadheads, I can just see the sneers. They do not want to be in any club that admits people like me (that is people who would even think of using “five minute breads”). The biggest criticism I hear over and over is that there is “too much yeast” in the five minute recipes and that the flavor of the bread suffers from lack of a long, slow fermentation. I admit that the yeast flavor can be quite strong, though I really don’t think the amounts are excessive. A half batch of ABin5 dough (enough to make 2 1+ lb loaves) takes 2 ¼ tsp of yeast (1 package), the same of many of my other yeast only recipes. And there is a long cold retardation in which the dough continues to develop. But still, many complain that the flavor is just not that good because of the yeast and the relatively fast fermentation, including my teenager, who constantly complains the bread is “too yeasty”.
For a while now, authors Zoe Francois and Jeff Hertzberg have been saying that you can reduce the yeast and compensate by giving the dough a longer “counter rise” (that period right after mixing which is usually only 2 hours for their standard recipes). Finally, on this post, the authors spell it all out. You can use as little as ½ tsp of yeast (1/4 tsp for the half batches that I usually make) and still have good results. The compromise is that the rise before refrigeration has to be much longer and resting the shaped loaf before putting it in the oven must be longer as well.
I decided to compare the master ABin5 recipe and the low yeast version in a head to head taste test. I prepared identical buckets of half batches ABin5 master recipe (you can find this recipe on the net here among other places), except that one half batch had only ¼ tsp of yeast (Active Dry yeast in this case) and the other half batch had the 2 ¼ tsp. called for in their standard recipes (REMEMBER: these were HALF batches).
The other change I made was to add only 2 tsp. salt to each half batch instead of the full amount (2 ¼ tsp). I was afraid that the full amount would be too much salt for the lower amount of yeast and I wanted to be able to taste bread and not salt when it came to the taste test phase.
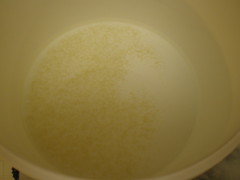

Here is a picture of the yeast in each bucket. You can see that it is significantly less in the “low yeast” bucket. (Because I am using “Active Dry” yeast, I add the yeast to the water first to make sure that the yeast gets hydrated.)
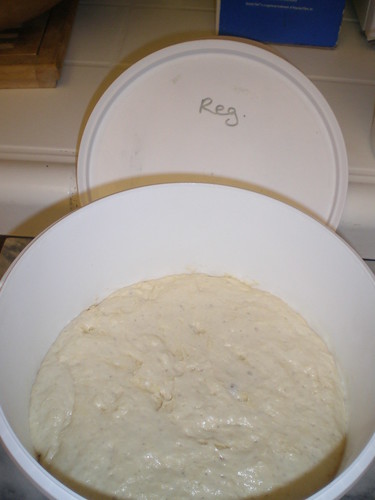
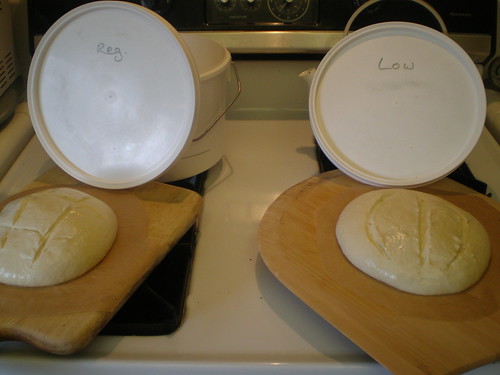
I followed the directions as precisely as possible. The regular yeast bucket got a two hour counter rise before refrigerating. Here is the regular yeast dough right before refrigerating.
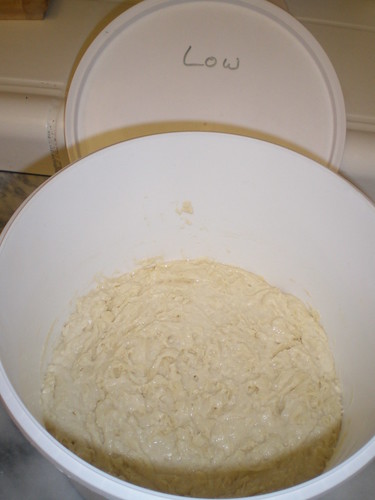
Here is what my bucket of low yeast dough looked like at the same two hour mark, much less activity at that point in time.
The webpage specifies a rising period of 6 to 12 hours before refrigeration for the low yeast version. My low yeast bucket sat on the counter for about 10 hours. The thermostat is set to turn off the heat at midnight and it goes back on around 7 on weekend mornings. That means that it gets down to about 55 degrees in my kitchen at night.
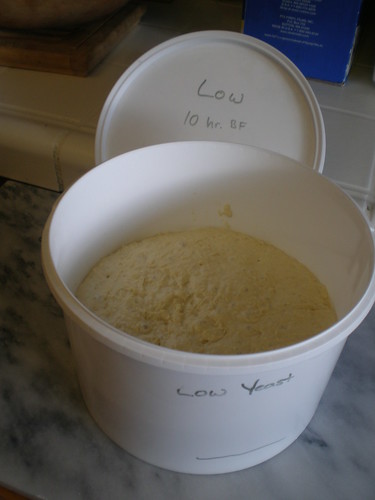
In the morning, there was plenty of activity in my low yeast bucket. You can see all the bubbles and that the amount of dough has increased significantly. To compare it to the regular yeast volume, I measured the distance from the top of the bucket to the surface of the dough in both buckets with a ruler. There was about ½” less in volume (distance of 3 ½ inches from the top) in the low yeast bucket at that point. The regular yeast version was only about 3” from the top, indicating more volume in the identical buckets.

After another 8 hours (dough age is about 20 hours at that point) the dough in both buckets has fallen slightly. Now there is only a ¼ inch difference in volume between the low yeast and regular yeast versions. On the next day when I took out dough to bake, it was about the same.

The following day (about 36 hours after mixing the dough), I made two identical 1 lb boules, weighing the dough so all things would be equal. I did not make them at the same time. According to the web site, Jeff recommended a 2 hour final proof on the counter before baking the low yeast version, while the regular version needs only about 40 minutes. So I made my low yeast boule and set the timer for 1 hour, 15 minutes. When the timer went off, I turned the oven on to preheat, and made the regular yeast boule so that they could be baked simultaneously on the stone in my oven.
Jeff suggests a 2 hour counter "rest" after shaping the low yeast loaf, while 40 minutes or so is standard for the Master recipe. I think that 2 hours was a bit too long for the low yeast boule’s final proofing. It flattened quite a bit, and—as you will see in the crumb shot below—there were large surface air bubbles that indicate over-proofing. I wanted to follow the directions exactly this time (and it was necessary to follow the timing recommendation so that I could have both boules bake together), but I will cut back a little on the proofing next time when using low yeast.

I covered each boule with an upside down bowl while proofing and they were in roughly the same place in the kitchen so that the temperatures were the same.

When the two hours were up, I scored the boules differently, so I could tell one from the other. The regular yeast boule got a cross hatch design, while I did a 3 slash design on the low yeast boule (I also chose that design because it was less likely to deflate an over-proofed boule).
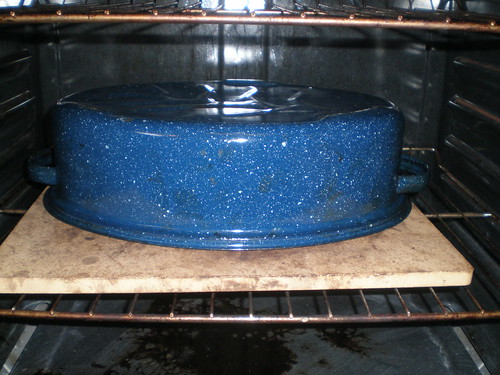
I placed both boules in the oven on my stone and baked them “en cloche”—that is under my large roasting pan bottom. The low yeast boule was a little too close to the edge and a part got trapped under the edge of the pan, burning in the process. But it didn’t really affect the rest of the boule.
After 17 minute I removed the roasting pan “cloche” and continued baking for about 14 more minutes. I checked the temperature of each loaf at that point. The regular yeast loaf was about 205 degrees, the low yeast loaf was about 210 (because it is flatter, I think the heat penetrated more quickly). Both came out “singing”.
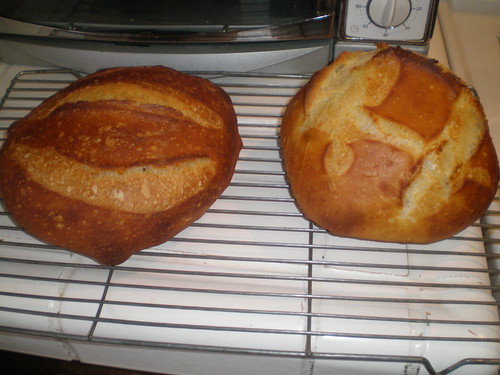
As you can see, the oven spring on the regular yeast loaf (on the right) is truly amazing. While there was a little oven spring on the low yeast loaf, it was not very much. That may have as much to do with overproofing as the amount of yeast, however. I’m eager to bake off the rest of this batch of dough and see if there is a difference when the dough has not been over-proofed.
The low yeast version was noticeably more caramelized than its regular yeast counterpart and had more surface blisters from the heat. The crust of the low yeast version was tastier and remained more crisp the next day when we finished off both breads. I liked the flavor of the low yeast version’s crust a lot.

The crumb shot clearly shows that the low yeast version (on the left) was over-proofed. Note the “mouse-sized holes” on the sides. Nevertheless, the rest of the crumb was nicely open and the texture was very nice. It was a bit lighter than the regular least version in texture—not so wet and glossy. My daughter especially liked the crumb better.
FLAVOR TEST
My “judges” consisted of my family. My DH is a wine connoisseur and has a very good palate, but he was a reluctant participant. My teenager is my biggest critic, and my little one my biggest fan (for now!). I did a somewhat blind taste test by slicing the bread into identical-looking pieces and placing the pieces on two different colored plates. Here are the responses:
Husband: "The blue plate bread has more depth of flavor and a nicer crust. I prefer that one".
Teenager: "The blue plate bread is better. It doesn’t taste all yeasty and it tastes just like Mary’s Pizza (local pizza chain) bread sticks. I love those bread sticks. That is good bread. The white plate bread is too yeasty—I don’t like the flavor".
Little one: "I like the white plate bread. It has more flavor".
Me: "The blue plate bread’s crumb (low yeast--you guessed it) definitely had a lighter texture and I think the taste is a bit sweeter overall, with a pleasant, crisp and crackly crust".
You can smell the yeast in the regular yeast bread even at a distance of a few feet. The crumb is denser and gummier—the mouth-feel is not as pleasant and the flavor is “earthier.
And the winner is . . .
The low yeast version. By a “landslide”!
Conclusion:
From now on, I intend to reduce the amount of yeast I use in my ABin5 and HBin5 breads and give the batches of dough a long rise on the counter (overnight, or all day) before refrigerating. More experimenting will have to be done to determine the ideal amount of times for counter resting shaped loaves before baking. I’ll post back when I have more experience with that.
So now I have a response to breadheads who complain there is too much yeast in five minute doughs—just reduce the dough and increase the rise! It STILL takes only 5 minutes of hands on time and the results are stunningly good.
This is wonderful and so interesting to see side by side. Thanks for doing this and sharing with us all!
ReplyDeleteEnjoy, Zoë
Wow! Thanks for doing what I've want to do myself- two batches at the same time. I agree with your findings. Less is more.
ReplyDeleteThis is great! thanks for doing this, I'll try the low-yeast version myself now. I didn't have much interest in it before.
ReplyDeleteThanks for this, I've been doing the HB5D and I can't stand the smell of yeast, puts me off ! Now that I have come across this, I will reduce yeast and see if it improves !
ReplyDeleteSo what's the final word? Did proofing it less work as expected? I was thinking too that you could adjust the yeast somewhere in between as well and adjust the fermentation based on it's volume. Maybe a down the middle recipe would be the best of all worlds. I can't deal with the amount of salt in the 5 minutes a day bread so I've cut it almost in half. The whole family gagged down the first loaf with full salt. I'm not sure why there aren't more complaints about that.
ReplyDeletejordan 6 black infrared
ReplyDeletenorth face coats
hermes belt
fitflop outlet store usa
under armour outlet
burberry scarf
gucci shoes
coach handbags
burberry sale
kevin durant shoes
north face jackets
converse shoes sale
coach factory outlet
air jordan 14
coach factory outlet online
louboutin outlet
fitflop sale
nike nfl jerseys 2015
north face outlet store
ugg boots
reebok outlet
michael kors handbags
christian louboutin sale
north face jackets clearance
new kevin durant shoes
nike clearance
toms outlet
dior handbags
michael kors outlet store
fitflops clearance
kate spade sale
jordan 12
ugg boots
coach purses sale
gucci outlet
wholesale jordans
canada goose clearance
1030wjl
1 columbia outlet
ReplyDeletenike air max
polo shirts
polo shirts for women
north face outlet 70% off
cheap michael kors handbags
air jordan retro 6
salvatore ferragamo outlet
north face clearance
mbt shoes clearance outlet
reebok shoes outlet
polo ralph lauren factory store
celine handbags
christian louboutin shoes
michael kors handbags
fitflops online
jordan 6
ralph lauren extra 25% off
michael kors outlet
air jordan 11
coach factory online sale
jordan shoes
kd shoes
coach handbags outlet
coach shoes for women
gucci outlet
abercrombie and fitch outlet
ferragamo shoes outlet
air jordan 11 legend blue
michael kors factory outlet online
michael kors store
all jordan shoes
ugg boots sale
fitflop sandals for women
gucci outlet
cheap canada goose coats
nike running shoes
1030wjl